
Welcome to Chapter 2 of Practical Playwright Automation with JavaScript! In the previous chapter, you learned what Playwright is and wrote your very first automation script. Now, we’ll go a bit deeper into setting up Playwright properly and understanding how to organize your project from day one.
This chapter is all about getting your hands dirty, setting up Node.js, installing Playwright, running your first test with the Playwright Test Runner, and seeing how everything fits together.
Why setup matters
Before we start automating, it’s important to have a clean environment. A proper setup ensures your tests are reproducible on any machine whether it’s your laptop or a CI server.
Many issues in automation come from inconsistent environments (like different Node versions or missing browsers). With Playwright, setup is simple and consistent.
Step 1: Install Node.js
If you don’t have Node.js installed, go to nodejs.org and download the LTS (Long-Term Support) version.
To check if it’s installed correctly, run:
node -v
npm -v
You should see version numbers for both. Any version 16 or above is perfect.
Step 2: Create a new project folder
Open your terminal and create a new folder for your Playwright project:
mkdir playwright-getting-started
cd playwright-getting-started
Initialize a Node project:
npm init -yThis creates a simple package.json file to track your dependencies.
Step 3: Install Playwright
Run this command to install Playwright and the browsers it uses:
npm i -D playwright
npx playwright install
Here’s what happens:
npm i -D playwrightinstalls Playwright as a development dependency.npx playwright installdownloads the required browser binaries (Chromium, Firefox, and WebKit).
You can choose to install only one browser if you like. For example:
npx playwright install chromiumThis will download only Chromium (Chrome/Edge engine) and skip others.
Step 4: Verify installation
To confirm everything’s working, run:
npx playwright --versionYou should see something like:
Version 1.56.1That’s it, Playwright is installed!
Step 5: Understanding Playwright’s structure
When you install Playwright, it sets up a few useful tools automatically:
- Playwright Test Runner: Built-in test framework (no need for Jest or Mocha).
- Playwright Inspector: A visual debugging tool.
- Trace Viewer: To view recorded sessions after tests.
- Codegen Tool: To record your actions and generate test code automatically.
We’ll explore each of these later, but for now, just know that Playwright is an all-in-one testing toolkit.
Step 6: Create and run your first test
Now, let’s use the Playwright Test Runner to create a real test.
Initialize it with:
npx playwright test --initThis command does a few things:
- Creates a
tests/folder. - Adds a sample test file (
example.spec.js). - Generates a configuration file:
playwright.config.js
Let’s open that sample test (tests/example.spec.js):
import { test, expect } from '@playwright/test';

test('basic test', async ({ page }) => {
  await page.goto('https://playwright.dev/');
  const title = await page.title();
  console.log('Page title:', title);
  await expect(page).toHaveTitle(/Playwright/);
});
Run the test:
npx playwright testPlaywright will:
- Launch a headless browser.
- Open the Playwright website.
- Check that the title includes “Playwright”.
- Close the browser automatically.
You should see output like this:
Running 1 test using 1 worker
  ✓ tests/example.spec.js:3:1 › basic test (2s)
Congratulations, you’ve just run your first real Playwright test!
Step 7: Run in headed mode
Headless browsers are faster, but sometimes you want to see what’s happening. You can run tests in headed (visible) mode using:
npx playwright test --headedYou’ll see a browser open and close during the test, this helps when debugging or learning.
Step 8: Take a screenshot manually
Let’s modify the test to take a screenshot after loading the page.
Update your test to:
import { test, expect } from '@playwright/test';

test('take a screenshot', async ({ page }) => {
  await page.goto('https://playwright.dev/');
  await page.screenshot({ path: 'homepage.png', fullPage: true });
  await expect(page).toHaveTitle(/Playwright/);
});
Run again:
npx playwright testA file named homepage.png will appear in your project folder, your first automated screenshot using the Test Runner.
Step 9: Folder structure overview
Here’s what your folder should look like now:
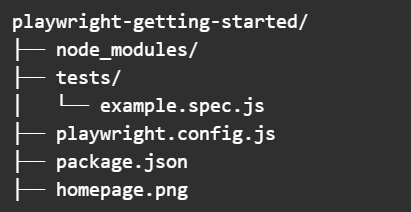
This is a clean, minimal setup for any Playwright project.
As your project grows, you’ll add folders like
/pages(for Page Object Model) and/fixturesfor reusable setup code. We’ll cover this soon.
Common installation issues (and fixes)
| Issue | Cause | Fix |
|---|---|---|
Cannot find module '@playwright/test' | Missing dependency | Run npm i -D @playwright/test |
browserType.launch: Executable doesn’t exist | Browser binaries not installed | Run npx playwright install |
node: command not found | Node.js not installed or not in PATH | Reinstall Node.js and restart terminal |
Exercise
Task 1: Modify your test to open https://github.com and take a screenshot.
Task 2: Try running your test in Firefox and WebKit:
npx playwright test --project=firefox
npx playwright test --project=webkit
Bonus: Add a console log to print the page URL after navigation.
Cheat Sheet
| Command | Description |
npm init -y | Initialize a Node.js project |
npm i -D playwright | Install Playwright |
npx playwright install | Download browsers |
npx playwright test --init | Initialize Playwright Test framework |
npx playwright test | Run all tests |
npx playwright test --headed | Run tests with a visible browser |
npx playwright codegen <url> | Record user actions (we’ll learn soon) |